Share This Pattern :
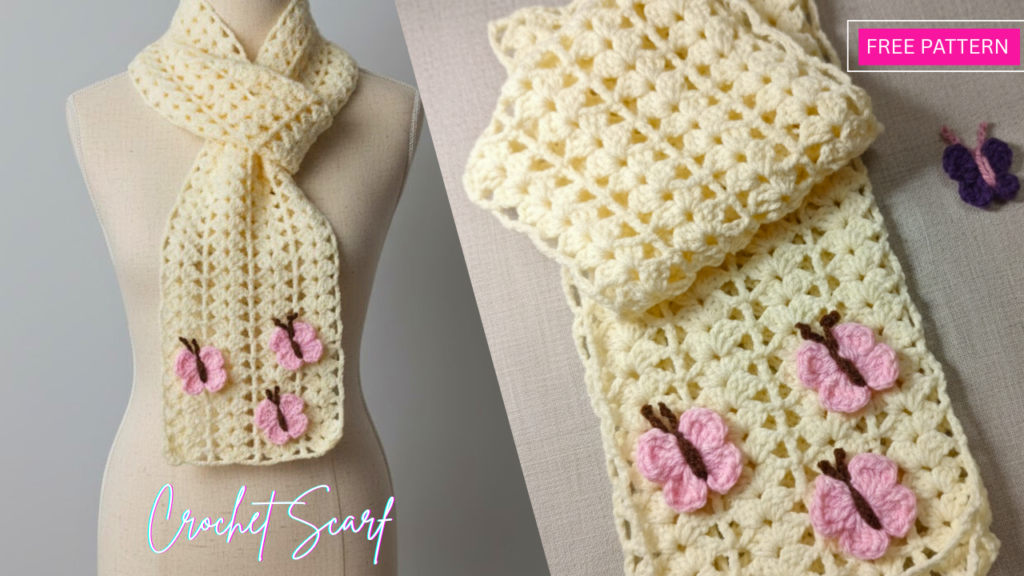
This is an easy crochet scarf pattern that’s perfect for beginners? This free crochet scarf pattern creates a beautiful, lacy accessory using the classic shell stitch. It’s perfect with any style, and makes a prefect gift as well. Best of all, you can make it with just one skein of yarn!
Why You’ll Love This Free Crochet Scarf Pattern
This beginner crochet scarf pattern is designed with simplicity in mind. The shell stitch creates an elegant, openwork design that looks impressive but uses only basic crochet stitches.
It’s the perfect first scarf project if you’re new to crochet, and it works up quickly enough to finish in a weekend.
It uses a repeat of the same 2 rows, so literally whatever your skill level is, you can make it.
Skill Level
Easy / Beginner-Friendly
If you know how to chain and make a single and double crochet stitch, you can make this scarf!
This is an excellent pattern for new crocheters who want to practice their skills while creating something beautiful and wearable.
Materials Needed
- Yarn: 330 mt – 361 yards light weight yarn (one skein) –
- 3.0 mm crochet hook
- Stitch markers
- Another 2 colors yarn for the butterflies ( optional )
- Scissors
- Yarn needle for weaving in ends
Gauge: 4 shell clusters = 16 cm wide (does not matter for this project)
Finished Size: 16 cm wide and 130 cm long (adjustable)
Crochet Abbreviations
- ch = chain
- dc = double crochet
- sp = space
- st = stitch
- sc = single crochet
Free Crochet Scarf Pattern Instructions
Foundation Chain
Start by making a chain in multiples of 10 stitches for your desired scarf width.
For example: Chain 30 for a narrow scarf (about 6 inches wide) or chain 50 for a wider scarf (about 8 inches wide), or more, mine was 40 chains but the important part it should be multiples of 10.
Tip: Your foundation chain determines how wide your scarf will be.
Row 1: Creating Your First Row of Shells
- Skip the first 4 chains from your hook, then work into the 5th chain
- In that 5th chain, create your first shell: (3 dc, ch 2, 3 dc) – this is your shell stitch!
- Chain 1
- Skip the next 4 chains
- Work 1 dc into the 5th chain
- Chain 1
- Repeat steps 2-6 across the entire row until you reach the end
- You should end with a single dc in the last chain
- Chain 4 and turn your work
What it should look like: You’ll have beautiful fan-shaped shells separated by single double crochet stitches across your row.
Row 2 and All Following Rows

Now you’ll repeat this simple pattern to create your scarf:
- In each ch-2 space (the center of each shell from the previous row), work a new shell: (3 dc, ch 2, 3 dc)
- Chain 1
- Work 1 dc on top of each single dc from the previous row
- Chain 1
- Repeat steps 1-4 all the way across the row
- At the end of the row, chain 4 and turn
Keep going! Simply repeat Row 2 over and over until your scarf reaches your desired length.
Most scarves are between 150 – 170 inches long, but you can make yours shorter or longer depending on your preference, mine was 130 cm, so it’s totally up to you.
Adding the Butterfly

Once you’ve crocheted your scarf to your desired length, you’ll add a beautiful butterfly pattern to the bottom edge, you can add it across the whole scarf too, it’s really up to you.
MR, (ch3, dc,ch3,slst) x 4
tighten you’re ring and weave in the ends.
take a small dark yar, make two knots on the edges, wrap it around the middle of the butterfly and make a knot.
I made all my butterflies in the same color, but I also made another scarf with 2 pink and one purple and the result were amazing as well, so you can add your own touch here, it can also be something different like a ladybug, a sunflower or any accessories, leaving the scarf as is also works.
Finishing Off
- When your scarf is at your desired length, before you fasten off your yarn
- make this to be your last row to make a smooth border, (sc in the ch2 space, ch4, dc over the previous dc) repeat.
- Use your yarn needle to weave in all loose ends
- Optional: Block your scarf by gently pinning it to size and lightly steaming or dampening it to help the stitches lay flat and even
- Optional: Add fringe or tassels to the ends for extra flair!
Helpful Tips for Beginners
- Count your stitches at the end of each row to make sure you’re staying consistent
- Keep your tension even – not too tight or too loose – for the best-looking shells
- Use stitch markers if you need help keeping track of where to place your shells
- Don’t stress over perfection – handmade items have character, and small variations add to the charm!
- Practice the shell stitch on a small swatch first if you want to build confidence
Customization Ideas
This free crochet scarf pattern is wonderfully versatile!
Here are some ways to make it your own:
- Change the width: Add or subtract chains in multiples of 10 from your foundation chain
- Try different yarn weights: Use bulky yarn for a chunky winter scarf or cotton yarn for a summer wrap
- Add stripes: Change colors every few rows for a fun striped effect
- Make it longer: Keep crocheting until it becomes a wrap or shawl
- Use variegated yarn: Self-striping or gradient yarn creates stunning effects with no extra effort
For the Full video tutorial tutorial
Happy crocheting!