Share This Pattern :
Ready to crochet a stylish phone bag in just one afternoon? This modern moss stitch phone bag pattern is perfect for beginners who want a quick, practical project with beautiful texture. Whether you’re making a crossbody phone purse for yourself or a handmade gift, this free crochet pattern delivers professional results every time.
So grab your hook and let’s get started.
What You’ll Need to Crochet This Phone Bag
Materials List
- Yarn: Worsted weight (#4) cotton or acrylic in your main color
- Accent yarn: Small amounts in 2-3 coordinating colors for the flower pocket detail
- Hook size: 4mm
- Notions: Snap button or magnetic clasp, yarn needle, scissors
Crochet Abbreviations Used
- ch = chain
- sc = single crochet
- sl st = slip stitch
- MR = magic ring
- sk = skip
- dc = double crochet
- hdc = half double crochet
- yo = yarn over
Moss stitch : for the moss stitch, work sc, ch1 sk st, then repeat this for the first round/row of moss stitch, then you’ll work in the space between the v’s of the previous round.
Pattern Instructions
Part 1: Creating the Phone Pouch Body
Foundation Round
Start by measuring your phone width and adding about 1-2 cm for ease. Most standard smartphones require a foundation chain of 18.
- Chain 18 (or adjust to your phone width—add or subtract chains in even numbers)
- Skip the first chain from hook
- Work single crochet stitches around the entire chain to create an oval base
- You’ll now work continuously in rounds, no slst, ch at the end of each round (this is key for seamless construction)
This completes Round 1 and establishes your working direction.
Moss Stitch Texture Rounds
The moss stitch is what gives this phone bag its signature woven appearance. It’s created by alternating single crochet stitches with chain spaces.
Round 2:
- Single crochet, chain 1, skip next stitch
- Repeat this pattern continuously around
- The chain-1 spaces create the characteristic “V” shapes
Round 3 and beyond:
- Single crochet into the large space between the V-stitches (not into the actual stitch)
- Chain 1, skip the next single crochet
- Continue this moss stitch pattern around and around
How tall should you crochet? Keep working rounds until the bag measures your phone height. The beauty of this pattern is you can try-fit your phone as you go.
Part 2: Shaping the Closure Flap
Once your pouch body reaches the desired height, it’s time to create the fold-over flap that keeps your phone secure.
Transition to Working in Rows
Stop working in continuous rounds. You’ll now crochet back and forth to form a flat flap.
- Leave approximately 3 stitches unworked at each side corner (these will become the sides of your bag)
- Turn your work
- Continue the moss stitch pattern in straight rows for 9 rows—this creates the flap length
Tapering the Flap for a Professional Finish
To prevent a bulky, rectangular flap, you’ll decrease slightly:
- Row 10: Decrease 1 stitch at the beginning and 1 at the end.
- Row 11: Repeat the same decrease pattern
- Fasten off and weave in the ends.
Attaching Your Closure
attach a magnetic snap button to the flap and the body in a fit position.
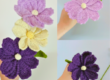
Part 3: Making the Mini Flower Pocket
This decorative granny square motif isn’t just cute, it’s functional storage for cards, cash, or wireless earbuds. The flower design uses classic granny square construction techniques.
Round 1 – Flower Center
- With yellow or your chosen center color, create a magic ring
- Work 8 single crochet stitches into the ring
- Pull the tail to tighten, slip stitch to join
- Fasten off and weave in the end
Round 2 – Creating Petals
Attach your first petal color to any stitch:
- Chain 2 (this counts as the first double crochet)
- In the same stitch, work 3 unfinished double crochet stitches
- After completing 4 loops total on your hook, yarn over and pull through all loops at once—this creates one petal
- Chain 2
- Repeat this petal pattern (4 unfinished dc, close together, ch 2) in each of the remaining 7 stitches
- Slip stitch to first stitch to join
- Fasten off
You should now have 8 flower petals radiating from the center.
Round 3 – Forming the Square Shape
Attach your third color to any chain-2 space:
- First corner: Chain 3 (counts as dc), work 3 dc, chain 2, 3 dc all in the same chain space
- First side: In the next two chain spaces, work 3 half double crochet in each
- Second corner: In the next chain space, work (3 dc, ch 2, 3 dc)
- Second side: 3 hdc in each of the next two spaces
- Continue this corner-side-corner-side pattern around the entire square
- Slip stitch to join, fasten off
Make a second border the same way, this time the side is gonna take 3 spaces not just 2.
Attaching the Pocket to Your Phone Bag
- Position the granny square motif on the bottom front of your phone pouch, centered
- Using matching yarn and a slip stitch, attach along three sides (bottom and both sides)
- Leave the top edge open so you can actually use it as a pocket
- Weave in all ends securely
The pocket opening should face upward when the bag is worn, making it easy to access your cards or cash.
Part 4: Adding a Strap
The strap attachment method is demonstrated in detail in the video tutorial.
Adjustable option: Use a swivel clasp and D-rings for a detachable, adjustable strap that can switch between crossbody and wristlet styles.
How to Adjust This Pattern for Any Phone Size
One of the best features of this crochet phone bag pattern is its flexibility. Here’s exactly how to customize the dimensions:
Adjusting Width
| Phone Type | Foundation Chain | Example Models |
|---|---|---|
| Compact/Small | Chain 16 | iPhone SE, iPhone 12/13 Mini |
| Standard | Chain 18 | iPhone 14, Samsung Galaxy S23 |
| Plus/Max Models | Chain 20-22 | iPhone 15 Pro Max, Galaxy S23 Ultra |
Creative Variations and Styling Ideas
Color and Texture Options
- Gradient effect: Use a variegated or ombre yarn like Caron Cakes for automatic color transitions
- Bold contrast: Make the body in a neutral tone and the flower pocket in vibrant jewel tones
- Monochrome modern: Work everything in one color with different textures (cotton body, velvet flower)
- Earthy vibes: Combine natural cotton colors (cream, tan, sage green)
Functional Upgrades
- Add a fabric lining: Sew in a cotton fabric lining with a zipper pocket for a premium finish that protects your phone screen
- Make it water-resistant: Use nylon or polypropylene yarn for outdoor festivals and beach trips
- Add a key ring: Attach a small D-ring or lobster clasp inside to clip your keys
- Create matching accessories: Use the same moss stitch pattern for a matching coin purse or larger crossbody bag
Embellishment Ideas
- Swap the flower pocket for a simple square pocket if you prefer minimal design
- Add a vintage button to the flower center for extra detail
- Embroider initials on the flap for personalization
Tips for Perfect Results
Tension matters: Keep your stitches consistent but not too tight—the moss stitch should have a slight drape for the best texture definition. If your fabric feels stiff, try going up a hook size.
Yarn substitutions: While the pattern calls for worsted weight, you can use DK weight yarn with a 3.5mm hook for a more delicate bag, or bulky weight with a 6mm hook for a chunky, statement piece.
Washing and care: If using cotton yarn, hand wash in cool water and reshape while damp. Acrylic yarn can be machine washed on gentle cycle and air dried.
Structural integrity: The moss stitch creates natural stability, but if you want extra structure, try doubling the yarn or adding a layer of interfacing inside before attaching your lining.
Frequently Asked Questions
Can complete beginners make this phone bag?
Yes! This pattern is specifically designed for crocheters who know basic stitches (chain, single crochet, slip stitch). The moss stitch looks intricate but is just a simple repetition of sc and ch-1. The included video tutorial walks through every step, making it an excellent first bag project.
How long does it take to crochet this phone bag?
Most crocheters complete this project in 2-4 hours depending on their speed and the final size. The moss stitch works up quickly, and since you’re working in rounds, there are no seams to sew. It’s the perfect binge-watch project or rainy afternoon make.
Can I sell phone bags made from this pattern?
Absolutely! You have full permission to sell finished items made from this free pattern. I only ask that you credit “crochet Phone Bag Pattern by Sinarra / crewchet.com” in your product listings. Please do not redistribute or resell the pattern itself.
I’d Love to see your finished gloves
join our Facebook group
Follow us on
Subscribe to our YouTube Channel for more tutorials
Happy crocheting!