")
Share This Pattern :
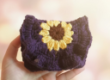
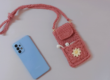
Are you looking for the perfect crochet phone bag pattern that’s both stylish and functional? This easy Crochet phone bag pattern is perfect for crocheters of all skill levels! In less than an hour, you’ll create a trendy crossbody phone pouch that keeps your hands free while protecting your smartphone.
So grab your hook and let’s get started!
Materials Needed for Your Crochet Phone Bag
Yarn and Hook Requirements
- Yarn: Medium weight (4) yarn in 2 colors
- Main Color
- Contrast Color
- Hook Size: 4.0mm crochet hook
- Notions:
- Magnetic snap button (18mm)
- Scissors
- Yarn needle
- Stitch markers (optional)
Pro Tip: Cotton yarn works best for phone bags as it’s sturdy and holds its shape!
Crochet Phone Bag Pattern: Step-by-Step Instructions
Step 1: Foundation Chain and First Row
Starting Your Phone Bag:
- Chain 18 with your main color
- Single crochet (sc) in the 3rd chain from hook
- Continue sc across the entire foundation chain
- Chain 3, turn (this counts as your first double crochet)
- 2 DC in the first stitch (right at the base of your ch-3)
- Skip 2 stitches
- 3 DC in the next stitch
- Repeat “skip 2, 3 DC in next” across the row
Creating the First Corner:
- When you reach the last loop of the row, work: (3 DC, ch 2, 3 DC, ch 2, 3 DC) all in the same loop
- This creates a nice corner that gives your bag a professional finish
Working the Back Side:
- Now you’ll work along the back of your foundation chain (the bottom of your starting chain)
- Skip 2 chains, 3 DC in the next chain – repeat across
- When you reach the last stitch, work: (3 DC, ch 2, 3 DC), ch 2 to complete the second corner
- Slip stitch to the top of the beginning ch-3 to close the round
Adding the Contrast Color
Round 2: Color Change
Attaching Your Contrast Color:
- Cut your main color
- Attach your contrast color to any 3-DC cluster space (the gap between clusters)
- Work (3 DC, ch 1) in each space between clusters around the entire bag
At Each Corner:
- Work (3 DC, ch 2, 3 DC) in each corner ch-2 space
- This maintains the rounded corner shape while adding height
Final Round and Finishing
Round 3: Smooth Edge
Instructions:
- Continue with contrast color (or switch back to main color)
- DC in each stitch around the entire bag
- At corners: Work 3 DC in the corner ch-2 space
- Slip stitch to join at the end of the round
- Fasten off and weave in ends
Result: You now have one complete panel! Time to make the second one.
Joining the Two Panels
This crochet joining technique ensures your phone bag is sturdy and attractive!
Instructions:
- Place both panels right or outer sides together (inside facing inside)
- Attach yarn at one bottom corner
- Single crochet through both layers around three sides of the bag
- Leave the top edge open (this is where your phone slides in!)
Joining Technique:
- Insert hook through both panels at once
- Work 1 SC through both layers
- Continue around, spacing stitches evenly (about 1 SC per stitch)
- At corners, work 3 SC to keep the bag from bunching
Pro Tip: Use a yarn color that matches one of your panels, or choose a complementary accent color for a custom look!
Making the Romanian Cord Strap
What is Romanian Cord?
Romanian cord (also called Romanian braid) is a thick, sturdy cord perfect for bag straps. It’s surprisingly easy to make and creates a professional-looking finish!
How to Crochet Romanian Cord:
- Chain 2
- Sc in 2nd chain from hook
- Rotate your work so the back bump of chains faces you
- sc in the back bump of the last 2 chains
- Repeat step 5, always working into the back bumps
Continue until your cord is your desired length – watch the video if you are confused
Strap Attachment:
- Attach one end to the top corner of your bag with slip stitches
- Weave through several stitches for security
- Repeat on the opposite corner
- Weave in all ends securely
Alternative Strap Options:
- Chain stitch strap (quicker but less sturdy)
- Braided yarn strands
- Purchased chain or ribbon
- Adjustable slider for customizable length
Creating the Flap Closure
This crochet phone bag flap keeps your device secure!
Flap Pattern:
- Chain 6
- SC in 3rd chain from hook and across
- Ch 3, turn
- Work the same cluster pattern:
- 2 DC in first stitch
- Skip 2 stitches
- 3 DC in next stitch
- Work corners: (3 DC, ch 2, 3 DC)
- Work back side along foundation chain
- Complete with slip stitch
- Follow the same round progression:
- Round 2: 3 DC clusters with ch-1 between
- Round 3: DC in each stitch
- Create corners with 3 DC
Attaching the Flap:
- Position flap on the back panel of your bag, centered at the top edge
- Sew securely along one short edge using yarn needle
- Make sure it hangs down over the front when closed
Finishing Touches and Care Instructions
Weaving in Ends
Use your yarn needle to weave all loose ends into the back of your stitches for a clean, professional look. Weave each end in at least 2-3 different directions for security.
Blocking Your Phone Bag (Optional)
For an extra-polished look:
- Lightly mist your finished bag with water
- Shape into desired dimensions
- Let air dry completely
- This helps even out stitches and set the shape
Care Instructions
To keep your handmade phone bag looking great:
- Hand wash in cool water with mild detergent
- Lay flat to dry
- Avoid harsh chemicals or bleach
- Store flat or hanging to maintain shape
Troubleshooting Common Issues
Problem: Bag is Too Tight
Solution: Use a larger hook size or add more foundation chains
Problem: Corners Are Bunching
Solution: Make sure you’re working (3 DC, ch 2, 3 DC) in each corner space every round
Problem: Panels Don’t Match
Solution: Count your stitches on each panel. They should be identical. If not, carefully unravel and redo the shorter panel.
Problem: Magnetic Button Won’t Stay Closed
Solution: Make sure the two parts are properly aligned. You may need to adjust the placement or use a stronger magnet.
Frequently Asked Questions
Q: How long does it take to crochet a phone bag? A: Most crocheters complete this project in 1-2 hours, depending on experience level.
Q: Can I use different yarn weights? A: Yes! Lighter yarn (DK or sport weight) creates a more delicate bag, while bulky yarn makes a chunkier, statement piece. Adjust hook size accordingly.
Q: Will my phone fit? A: This pattern fits most standard smartphones (iPhone, Samsung Galaxy, etc.). For plus-sized phones, add 2-4 chains to the foundation.
Q: Can I sell bags made from this pattern? A: Yes! You’re welcome to sell finished items. But Credit to the pattern is required.
Q: What if I’m a complete beginner? A: This pattern uses basic stitches (chain, SC, DC) but requires understanding of working in rounds. Practice these stitches first, then tackle this project!
Q: Can I make this without the flap? A: Absolutely! Simply skip the flap section and you’ll have an open-top phone pouch.
I’d Love to see your finished bag
join our Facebook group
Follow us on
Subscribe to our YouTube Channel for more tutorials
Happy crocheting!
This pattern is free for personal use and to sell finished items. Please do not redistribute or claim as your own.