
Share this pattern :
Learn how to make these quick and cozy fingerless gloves using a unique textured stitch technique!
This beginner-friendly pattern takes less than an hour per glove and creates a beautiful, stretchy fabric.
So Grab your hook and let’s get started.
What You’ll Need
- Light Worsted weight yarn
- 4.0 mm crochet hook
- Yarn needle
- Scissors
Skill Level
Easy – Perfect for beginners who know basic crochet stitches
Abbreviations – US terms
HDC: half double crochet
BLO: back loop only
FLO: front loop only
Slst: slip stitch
Special stitch:
This pattern uses an alternating back loop only (BLO) and front loop only (FLO) technique with half double crochet stitches. This creates:
- Beautiful texture
- Extra stretch
- A unique, professional look
How it works: Alternate making one hdc in BLO, then one hdc in FLO across the round.
This simple variation gives your gloves amazing dimension!
Gauge:
Gauge is not important for this project.
10cm x 10cm (or 4 inches x 4 inches) square:
- 21 stitches across (width)
- 35 rows down (height)
Pattern Instructions
Make the Cuff
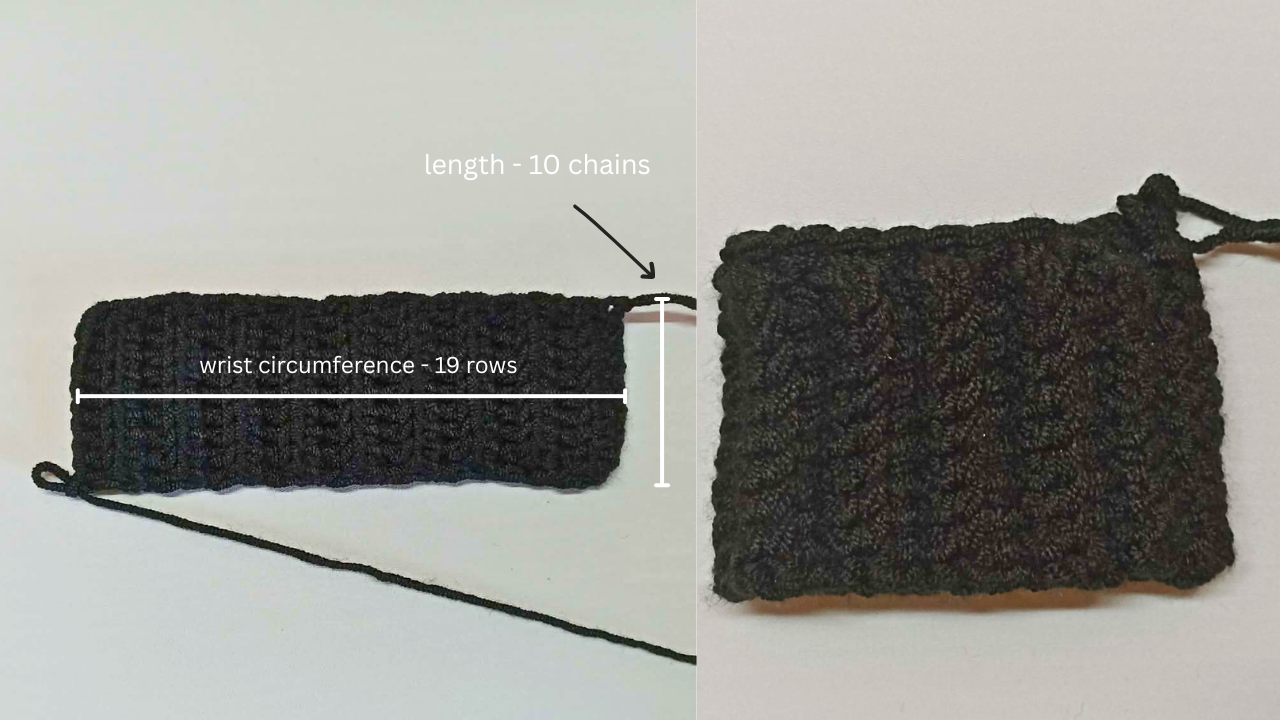
- Chain 10 (this is the length of your cuff)
- Work 19 rows of hdc in back loop only
- On the 20th row, join with a slip stitch to create a tube
- Single crochet evenly around the top edge (approximately 20 sc)
Fit Check: The cuff should wrap barely around your wrist with little space left. If it’s too loose or very far from closure, adjust your tension or add/remove rows.
Make the Hand
Work 10 rounds using the alternating BLO/FLO technique.
- 1st stitch: hdc in back loop only
- 2nd stitch: hdc in front loop only
- 3rd stitch: hdc in back loop only
- 4th stitch: hdc in front loop only
- Continue alternating to the end of the round, at the end, no chaining or slst
Create the Thumb Opening
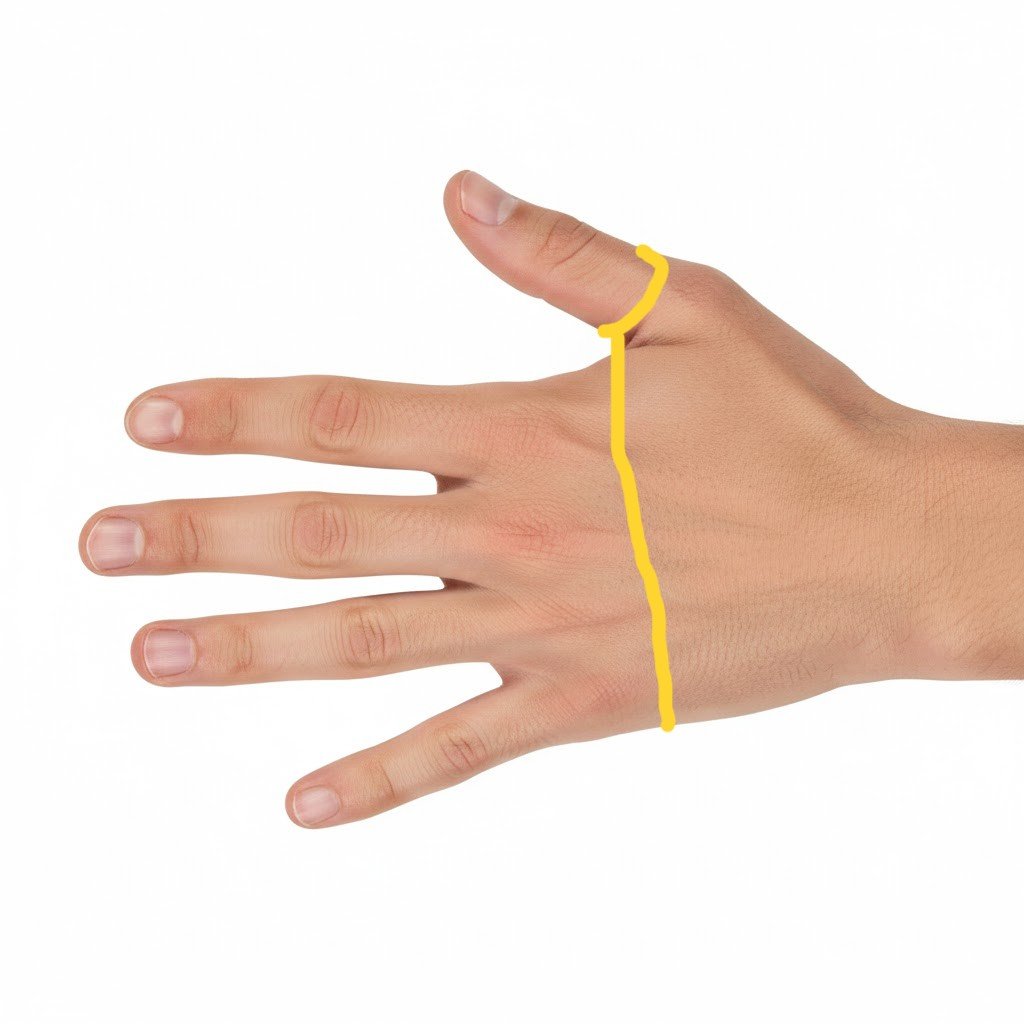
On round 10, or until you reach the line in the image above, ( can go one row below if it’s more comfortable to you ) work until you have 6 stitches remaining.
Chain 3, skip the next 5 stitches
Slip stitch into the 6th stitch (this completes the round)
Fit Check: Try on your glove! Your thumb should fit comfortably through the opening.
Finish the Glove
Continue working 2-4 more rounds in the alternating BLO/FLO pattern until the glove reaches your desired length
Fasten off and weave in ends
Optional Thumb Edging
For a polished look, you can add one round around the thumb opening:
- Join yarn at the thumb hole
- Single crochet evenly around the opening
- Slip stitch to join and fasten off
Tips for Success
Counting: Don’t worry too much about exact stitch counts.
The most important thing is that the cuff fits snugly around your wrist.
Tension: Keep your stitches consistent for even texture. The alternating loop technique is forgiving!
Fit: These gloves should be snug but not tight. The alternating stitch creates natural stretch.
Customization: Want longer gloves? Simply work more rounds before creating the thumb opening and after it!
You can use the same method for any stitch, same principles applies.
Making a Matching Pair
Repeat all steps for your second glove. Try to match the number of rounds so both gloves are the same length!
Since we did not slst, and chain at the end of each round, there will be no separating line visible, which makes the two pairs identical.
Frequently Asked Questions
How long does it take?
Each glove takes 30-45 minutes once you get the hang of the alternating stitch.
Can I use different yarn?
Yes! Just make sure to adjust your cuff width to fit your wrist properly.
Thicker yarn will make chunkier gloves.
My thumb hole is too small/big. What do I do?
Adjust how many stitches you skip and how many chains you make. Try different numbers until it fits comfortably.
Can I make these longer?
Absolutely! Just add more rounds before and after the thumb opening.
These fingerless gloves are perfect for:
- Texting and typing in cold weather
- Driving
- Quick gifts
- Craft fairs and markets
Share Your Creation!
I’d love to see your finished Gloves !
Join our Facebook group
Follow us on
Subscribe to our YouTube Channel for more tutorials
Happy crocheting!


1 Comment