Share This Pattern :
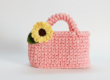
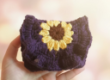
If you have been looking for a crochet bag that is structured, stylish, and surprisingly fun to make, this crochet shell bag pattern is exactly what you need. Inspired by the smooth, rounded shape of a clamshell, this bag is built from two flat circles joined together to create a perfectly curved body, and once you add the flap and strap, it looks like something straight out of a boutique window.
In this post, I am walking you through every step: how to build the circles, how to join them, how to shape the flap, and how to finish everything off with a closure and a strap. I will also share size tips so you can adjust this pattern to make a mini pouch or a larger everyday bag, so without further ado grab your hook and let’s get started!
Materials You Will Need
- T-shirt Yarn in your color of choice (approximately 300–400g depending on size)
- 6mm or 6.5mm crochet hook
- Scissors
- Stitch markers
- Button, magnetic clasp, or toggle closure
- Bag strap (premade, or same t-shirt yarn to make a Romanian twisted cord — see Assembly)
Finished Dimensions
- Circle diameter: 13 cm
- Flap length: 18 cm
- Bag length (height): 21 cm
- Bag width: 28 cm
Size tip: For a smaller bag, work fewer increase rounds on the circles and use a shorter joining chain. For a larger bag, add more standard increase rounds to the circles and chain more when joining. The rest of the pattern stays exactly the same.
Abbreviations Used (US Terms)
- MR – Magic Ring
- CH – Chain
- SC – Single Crochet
- WC ST – Waistcoat Stitch (also called Center Single Crochet — insert your hook under both loops of the stitch, going through the “V” at the front, to create a knit-like texture)
- INC – Increase (2 SC in one stitch)
- SLST – Slip Stitch
- BLO – Back Loop Only
- SK – Skip
- FO – Fasten Off
- Rnd – Round
- R – Row
Pattern Notes
- From Round 2 onward, the circles are worked in Waistcoat Stitch (WC ST) throughout. This gives the bag a beautiful woven texture and helps it hold its round shape.
- The bag body is worked in Back Loop Only (BLO), which creates a clean ridge and adds structure to the sides.
- The flap is worked in rows, not in rounds — this is what gives it its half-circle/shell shape. Keep reading for a full explanation.
Pattern Instructions
A. The Circles – Make 2
Rnd 1: MR, 6 SC. (6)
Rnd 2: INC x6. (12) Switch to WC ST from here.
Rnd 3: [SC, INC] x6. (18)
Rnd 4: [2 SC, INC] x6. (24)
Rnd 5: [3 SC, INC] x6. (30)
Rnd 6: [4 SC, INC] x6. (36)
FO the first circle and weave in ends. Do NOT fasten off the second circle — you will continue directly from here.
Size note: For a smaller bag, you can stop at Round 4 or 5. For a larger bag, continue with additional standard increase rounds: [5 SC, INC] x6 (42), [6 SC, INC] x6 (48), and so on, until your circle reaches your desired size.
B. Joining the Circles
With the second circle still on your hook, you are going to bridge across to the first circle to create the bag’s opening.
Step 1 CH 14. (For a wider bag , chain more. For a smaller one, chain fewer.
Step 2 – Join to the first circle: Bring your work to the first circle (right sides facing out) and join with a SLST into the corresponding stitch on the opposite side of the first circle.
Step 3 – Work the joining row: CH 1, SK 2 sts, SLST in next 2 sts, SC in next 10 sts, SLST in next 2 sts, SLST to join back into the second circle.
You now have both circles connected with a chain bridge between them.
C. The Bag Body
Now you will work around the outside edges of both joined circles to close up the sides of the bag and create the body.
Continue working SC in BLO along the chain bridge we created between the two circles, joining one st from each circle each row, this will create the bag sides.
Keep working in BLO until only 8 stitches remain at the top edge (the bag opening). These 8 stitches are your bag mouth — leave them open.
FO and weave in ends.
D. The Flap
The flap starts with an oval foundation chain and is then worked in rows — not in full rounds. This is the key to getting that lovely rounded half-circle shape. Each row is turned and worked back across, with increases added at the curved edges only, so the flap fans out gradually like the shell of a clamshell bag.
Foundation:
CH 10.
Row 1: SC in the 2nd CH from hook (working into the back bump of the chain), SC in next 8 bumps. In the very last CH, work 3 SC (this is your corner). continue working 8 SC without turning.
Row 2: CH 1, turn. 8 sc, inc x 3, 8 sc.
Row 3: CH 1, turn. 8 sc, (inc, 1 sc) x3 , 8 sc.
Row 4: CH 1, turn. 8 sc, (inc, 2 sc) x 3, 8 sc.
Row 5: CH 1, turn. 8 sc, (inc, 3 sc) x 3, 8 sc
Row 6: sc along the base to make it more uniform.
FO, leaving a long tail for sewing.
Assembly
1. Attach the flap: choose any side of the bag, both are the same between the 3rd and 4th row of the sides insert the long tail inside and start slst the flap to the bag.
2. Add a closure: On the front side of the bag (the other circle), sew your button, toggle, or magnetic clasp in the center, just below the bag opening. Sew the corresponding side of the clasp to the underside of the flap so they line up when the flap is closed.
3. Add a strap: You have two options here:
- Premade strap: Attach a metal or fabric strap to each side of the bag using the yarn needle and sturdy thread or by looping it through a stitch.
- Romanian cord: make a Romanian cord out of the same yarn you used for the bag.
Full Tutorial For a Romanian Cord
And that’s it — your shell bag is finished! 🐚
For More Patterns:
📍 Shop new patterns: https://sinarracrochet.gumroad.com
📍 Find more on Ravelry: @ravelry/sinarra
I’d love to see your finished bag!
Join our Facebook group
Follow us on Instagram | Facebook | Pinterest
Subscribe to our YouTube channel for more tutorials.
Happy crocheting! 🐚✨