Create an adorable crochet daisy headband that’s perfect for your little one’s photo shoots, special occasions, or everyday cuteness! This pattern features a simple crochet headband base with a beautiful no-sew daisy embroidery technique that looks professional but is surprisingly easy to make.
Why You’ll Love This Project
- Perfect for beginners – Uses basic stitches only
- No sewing required – The daisy is attached during the embroidery process
- Quick to make – Complete in under an hour
- Customizable – Use any color combination you love
- Gentle on baby – Soft materials with comfortable stretch
Materials Needed
For the Headband Base:
- Soft Medium weight acrylic yarn
- 4.0 mm crochet hook
- Scissors
- Yarn needle
- stitch markers (optional)
Here you will find a complete crochet kit for absolute beginners.
For the Daisy Embroidery:
- Baby cotton yarn in white (for petals) and yellow (for center)
- Tapestry needle (with large eye for yarn)
Headband Base Instructions
First Step : Starting Chain
Create a foundation chain of 60 chains, or continue chaining until your work measures approximately 38-39 cm (15-15.5 inches) when maximum stretched. This measurement includes allowance for the front twist and is perfect for 0-3 month old babies.
Why this measurement works: The slight stretch ensures a comfortable fit that won’t be too tight on your baby’s head while staying secure enough not to slip off.
Remember the best measurement is the one fits your baby’s head.
Second Step : First Row of Half Double Crochet
- skip a chain and start working hdc in the next chain.
- Continue working 1 hdc into each chain across
- You should have 59 double crochets total
Third Step : Second Row
- Chain 1 and turn your work
- Work 1 half double crochet into each stitch across
- Continue this pattern until your headband reaches your desired width (mine was 10 rows total for a baby headband) this width is also perfect for an adult as well.
Step 4: Finishing the Headband
- Fasten off, leaving a 12-inch tail for sewing
- Fold the headband in half lengthwise and sew the ends together using the yarn needle
- Weave in all ends securely
Remember this step will be made after the embroidery while not mandatory it makes your life easier.
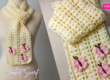
No-Sew Daisy Embroidery Technique
While the full visual tutorial is available on our YouTube channel , here’s an overview of the technique:
- Positioning: Place your headband flat and decide where you want your daisy.
- Petals: Using white baby cotton yarn and a tapestry needle, create petal shapes by bringing the needle up through one point and down through another, creating long stitches that form petals, secure the petal with a loop at it’s highest point, then fill it up with the yarn one thread at a time.
- Center: Using yellow baby cotton yarn, create a French knot or small circular stitches in the center of your petals.
- Securing: All threads are woven through the headband base itself, eliminating the need to sew on a separate flower.
Baby Headband Size Chart
Use this guide to ensure the perfect fit for different age groups:
| Age Group | Head Circumference | Headband Length (with stretch) |
|---|---|---|
| Newborn (0-3 mos) | 33-38 cm (13-15 in) | 38-39 cm (15-15.5 in) |
| 3-6 months | 39-42 cm (15.5-16.5 in) | 40-41 cm (16-16.5 in) |
| 6-12 months | 42-46 cm (16.5-18 in) | 42-43 cm (16.5-17 in) |
| 12-24 months | 46-49 cm (18-19.5 in) | 44-45 cm (17.5-18 in) |
| 2-4 years | 48-51 cm (19-20 in) | 46-47 cm (18-18.5 in) |
Pro Tip: Always check your gauge! Crochet a small swatch (10 chains x 5 rows) and measure it to ensure your tension matches the pattern requirements.
ribbed pattern like hdc in blo stretch too much so be aware of that, also these are the best measurements based on my practice and experience, make sure you always adjust it to fit the person, your yarn and tension.
Customization Ideas
- Color variations: Try pink daisies with yellow centers or white daisies with pink centers
- Multiple flowers: Add 2-3 smaller daisies along the headband
- Leaf accents: Embroider small green leaves near your daisy
- Different flowers: Adapt the technique to create roses or other floral designs
Safety Tips for Baby Crochet
- Secure attachments: Ensure all embroidery is tightly secured to prevent loose threads
- Avoid small parts: Don’t add beads or buttons that could pose a choking hazard
- Supervision: Always supervise babies while they’re wearing crochet items
- Comfort check: Ensure the headband isn’t too tight – you should fit two fingers between the headband and baby’s head
Watch the Video Tutorial
For step-by-step visual guidance on the no-sew daisy embroidery technique, watch our full tutorial:
Frequently Asked Questions
Q: Can I use different yarn weights?
A: Yes, but adjust your hook size accordingly and check your measurements frequently.
Q: How do I wash the headband?
A: Hand wash in cool water with mild detergent and lay flat to dry to maintain the embroidery.
Q: What if my headband is too tight/loose?
A: Adjust your starting chain length and always measure against the size chart before completing the headband.
Final Thoughts
This crochet daisy headband makes a wonderful gift for new parents or a special keepsake for your own little one. The no-sew technique creates a professional look that’s much easier than it appears!
We’d love to see your creations! Share your finished headbands on social media and tag us so we can admire your work.
you can find us :
on Instagram : https://www.instagram.com/sinarra1/
on Facebook : https://www.facebook.com/sinarraCrochet/
If you enjoyed this pattern, please Pin it for later! And to make sure you never miss a new design, subscribe to our newsletter for more free crochet patterns delivered weekly to your inbox.